Thursday, April 21, 2011

Easter Bunny

Ready for Easter?  The meaning of Easter is differently for many people.  For me, it usually means family time.  For my nails, it means pastels.  Let's get to it!


You will need:
  • Joe Butter (light yellow), Faded Violet (lavender), Powder Blue (light blue)
  • Sally Hansen Xtreme Wear White On
  • Jordana Black
  • Top coat
  • Thin paintbrush
  • Dotting pen/toothpick/paperclip
1.  Paint vertical stripes.

2.  With white, paint part of a circle at the tip for the head of the rabbit.

 3.  The ears are painted with a thin paint brush.  The top of the ears are wider than the bottom.  And I painted one ear flopped.

4.  Dot on 2 eyes and top coat to seal it.

5.  I painted the 2nd rabbit on my ring finger.  Start with a small circle for the head, then paint 2 lines for the ears.

6.  A bunny!!!  The body is an ovular shape and then 3 dots for the leg.  Make sure you put a dot for the tail too.


Hope you all have a happy and safe Easter long weekend!

- SheNailedMe

Wednesday, April 20, 2011

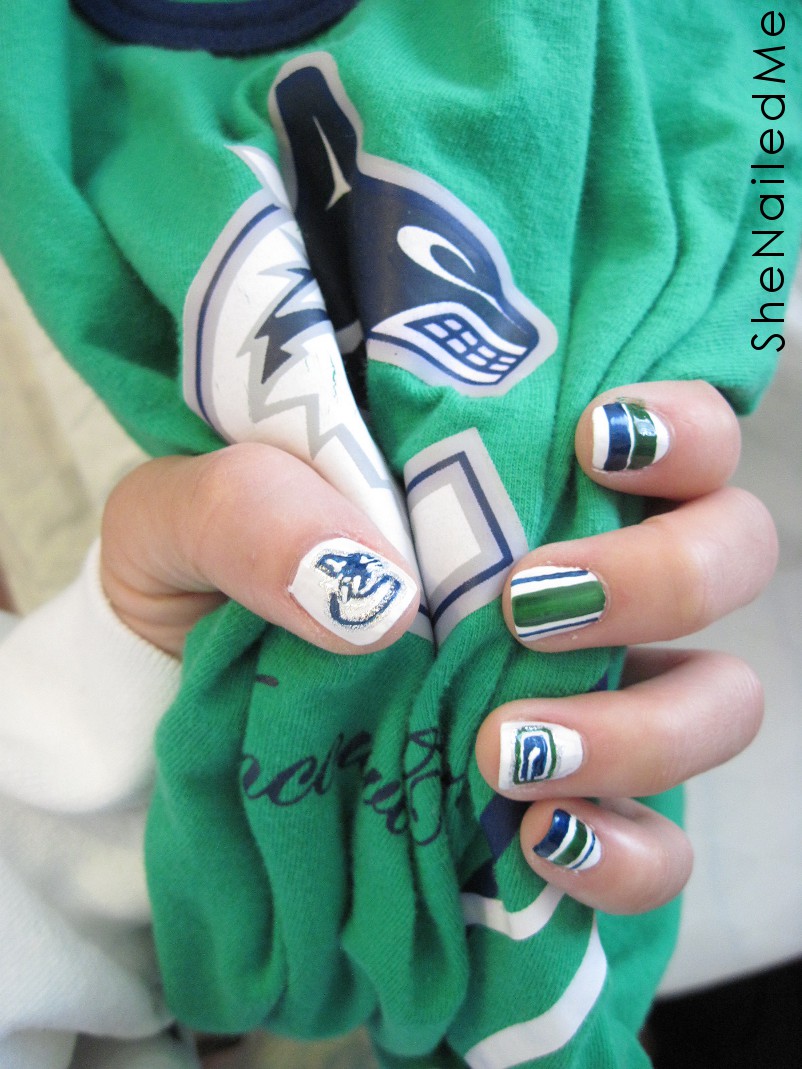
Canuckle head!

It's true.  Canadians like their hockey.  The Vancouver Canucks have been doing great.  Although we lost last night, I have faith we will beat Chicago.  I'm gonna support our team one finger at a time =P


You will need:
  • Sally Hansen Xtreme Wear White On (white)
  • Wet n Wild Wild Shine Sapphire Blue (navy blue)
  • Joe Jade (green)
  • Kiss Nail Art Paint Silver Glitter

 1.  Paint 'em white!


 2. Start painting that logo with a fine paint brush and blue.  I was looking at the logo on google images for reference.  I suggest outlining the image first and then filling it in.

3.  You should end up with something like this.  I outlined it with some silver to bring it all together.

4.  The next 2 fingers are just lines of blue and green like the jerseys.

5.  Paint the other logo.  This one is pretty straight forward.  Just a bunch of rectangles.  I thought I took pictures of painting it but it's not in my memory card =S

6.  The pinky and you're done!


Go Canucks Go!  Game on =)

- SheNailedMe

Tuesday, April 19, 2011

More pokadots!

Pokadot designs are easy and quick.  I recommend getting a dotting tool to make the process even more simpler.  Here's another quick design.


You will need:
  • Sally Hansen Xtreme Wear Mint (pale mint)
  • China Glaze For Audrey (Tiffany's)
  • Rimmel 60 Seconds Clear
  • Dotting tool/paperclip/toothpick
  • 20 mins


1.  Paint your tips in mint.  You can use a guide to help you.


2.  Dot with a Tiffany's colour! I dotted on the tips and then to one side of the nail. Just top coat and you're done!


A 2-3 step design.  Quick and easy =)
Time to head out in the sunny weather!

- SheNailedMe

Monday, April 18, 2011

Breezy Blue Flowers

Time to work on a steady hand.  I wanted to paint some flowers but have them a little more interesting.  I also got some new fakes in the mail.  They're clear, so you might see the tape through them =P.  Hope you like this one!


You will need:
  • Wet n Wild Megalast Hush Hush (pale pale light pink)
  • Jordana Black
  • Claire's Mermaid (pearly turquoise)
  • Kiss Nail Art Paint Silver
  • Thin paintbrush
  • Paperclip/toothpick/dotting pen
  • 50+ mins
 1. You can paint a base colour or leave it bare.  It looks good either way.  Paint 3 lines on the corner of the nail with a turquoise nail polish.

2.  Outline the 3 lines with black and a thin paintbrush as if painting part of a flower shape.

3.  At the tip of the pedals, paint a little curve out.

4.  Continue with the other pedals but curving the line towards the middle pedal.

5.  Using silver nail polish, fine line the center of the pedals and on the edges around the black.  I left the inner curves alone.

6.  Finally dot the outer curves with black.  Top coat and done!


It kind of looks like whimsical flowers in the wind??  A little bit more work but good practice for a steady hand.  It's eye catching too!

Good luck!

- SheNailedMe

Thursday, April 14, 2011

Night Out

I'm going to have a night out with my classmates.  We're done with our program and we think we deserve a good time!  We have a graduation tea during the day and then a party at night.  I thought I should erase the pink and go with a clean but fun black mani.  Something to bring me from day to night.


You will need:
  • Jordana Black
  • Fine black glitter polish (no name)
  • Kiss Nail Art Paint Silver
  • Rimmel Super Wear Top Coat
  • Sally Hansen Manicure Aid
  • 35 mins


1.  Tape with a manicure guide and paint a black tip.  My poor thumb nail chipped today =(  So short!

2.  Paint thin vertical lines of black/dark grey glitter on the tips.

3.  Paint thin vertical silver lines next to the glitter you just painted.  Make sure to leave the black underneath showing on the other side.  So it should look like glitter-silver-black-glitter-silver-black...etc.  Yes, I did get a silver/glitter fine line polish finally.

4.  Remove the tape!  You can keep it like this or do the next step.

5.  Continue the silver lining down the nail.  I went from longer to shorter lines.  You can also continue the dark glitter lines too.  I did that later.

6.  Top coat! =)


Some people don't like the black french tip look.  You can always do it in another colour or the classic white.  This was a really quick and easy design.  My hands are ready to do some fist pumping tomorrow night =)

Goodluck!

- SheNailedMe