Friday, April 29, 2011

Louis Vuitton

I've never owned a real Louis Vuitton anything.  It's way too expensive and I could never justify paying over $200 for a purse that only fits my wallet.  But I love the pattern!  My favourite is actually Damier Azur but I thought I should give the original Monogram a shot.  Make your nails expensive!!

You will need:
  • Revlon Chocolate Truffle
  • Joe Butter
  • Rimmel Top Coat
  • Fine paintbrush
  • 40 mins

1.  Start with a brown base.  The rest of the painting is done best when the brown base is completely dry.

2.  Paint a 'V' in the center of the nail with light yellow and a fine paintbrush.

3.  Starting from between the top of the 'V', make the letter 'L'.  The vertical line is supposed to be on a slight diagonal like that.

4.  Now paint 2 diamond shapes above and below the 'LV'.  There are also diamonds to the left and right of the 'LV' too.

5.  Now paint ' + ' on the 4 corners around the 'LV.


6.  There are circles on the remaining spots.  You can't really tell because the nail cuts off.

7.  Using the same brown as the base, paint ' + ' over the diamonds.

8.  Then add dots in the center of the yellow ' + '.

9.  Don't forget the ones that are cut off!  The circles have sort of the same brown ' + ' on them.  Just look at the pattern on google as reference.

10.  Use the yellow again, and dot the center of the brown ' + '.

11.  The circles too!  Top coat it all!


I only painted the thumb and ring finger because all fingers would take too much time.  I really like this one!  I guess it doesn't count as my own design since the pattern came from Louis Vuitton.  But hey, showed you how to do it =)

- SheNailedMe

Thursday, April 28, 2011

Let's Go Sailing!

I love nautical stripes!  It reminds me of sunny weather on the water.  This nail design is easy to do as long as you have steady hands to make horizontal stripes.  Shall we?

You will need:
  • Sally Hansen Xtreme Wear White on
  • Wet N Wild Wild Shine Sapphire Blue
  • Rimmel Top Coat
  • Gold decorative beads
  • Thin paintbrush
  • Toothpick (to put the beads on)
  • 45 mins
1.  Paint a white tip.  You don't need to use a guide.

2.  Paint on the navy horizontal lines over the white tips.  You need a steady hand but a good trick is to roll the finger you are painting on.

3.  For the ring finger, instead of painting just the tip, do the whole nail.

4.  Paint a top coat and add on decorative beads while it's still wet.  Make an anchor shape.  The go over it again with the top coat.


And there you go.  You can paint the whole nail for the entire hand instead of just the tips.  It might even look better.  I painted this before I went to LA.  Thought I would wear it but I'm a nail picker.  So I picked out the anchor while figuring out what to pack. =(

- SheNailedMe

Tuesday, April 26, 2011

Nails for LA

Went to LA for the long weekend with my other half.  I had a blast!
I didn't want to have naked nails for the trip but I had very little time to do them.  This is a really good quick nail design.  Again, they are dots.  Dots are so easy!!  Hope you like =)

You will need:
  • Joe Powder Blue
  • Sally Hansen Xtreme Wear White On
  • Wet n' Wild Wild Shine Sapphire Blue
  • Rimmel Top Coat
  • Dotting tool/toothpick/paperclip
  • 30 mins
 1.  Base colour.  I used Joe's Powder Blue.

2. Dots!!  I did my dots in a way where it almost looks like they're being blown in the wind or carried by a wave.

That's it!

Back to work!  Naked nails =(

- SheNailedMe

Thursday, April 21, 2011

Easter Bunny

Ready for Easter?  The meaning of Easter is differently for many people.  For me, it usually means family time.  For my nails, it means pastels.  Let's get to it!


You will need:
  • Joe Butter (light yellow), Faded Violet (lavender), Powder Blue (light blue)
  • Sally Hansen Xtreme Wear White On
  • Jordana Black
  • Top coat
  • Thin paintbrush
  • Dotting pen/toothpick/paperclip
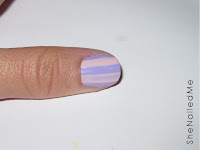
1.  Paint vertical stripes.

2.  With white, paint part of a circle at the tip for the head of the rabbit.

 3.  The ears are painted with a thin paint brush.  The top of the ears are wider than the bottom.  And I painted one ear flopped.

4.  Dot on 2 eyes and top coat to seal it.

5.  I painted the 2nd rabbit on my ring finger.  Start with a small circle for the head, then paint 2 lines for the ears.

6.  A bunny!!!  The body is an ovular shape and then 3 dots for the leg.  Make sure you put a dot for the tail too.


Hope you all have a happy and safe Easter long weekend!

- SheNailedMe

Wednesday, April 20, 2011

Canuckle head!

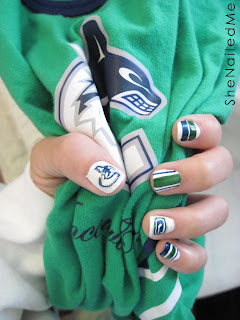
It's true.  Canadians like their hockey.  The Vancouver Canucks have been doing great.  Although we lost last night, I have faith we will beat Chicago.  I'm gonna support our team one finger at a time =P


You will need:
  • Sally Hansen Xtreme Wear White On (white)
  • Wet n Wild Wild Shine Sapphire Blue (navy blue)
  • Joe Jade (green)
  • Kiss Nail Art Paint Silver Glitter

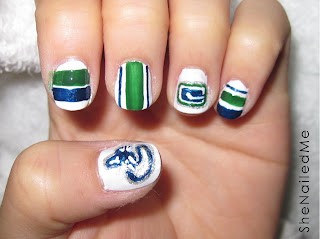
 1.  Paint 'em white!


 2. Start painting that logo with a fine paint brush and blue.  I was looking at the logo on google images for reference.  I suggest outlining the image first and then filling it in.

3.  You should end up with something like this.  I outlined it with some silver to bring it all together.

4.  The next 2 fingers are just lines of blue and green like the jerseys.

5.  Paint the other logo.  This one is pretty straight forward.  Just a bunch of rectangles.  I thought I took pictures of painting it but it's not in my memory card =S

6.  The pinky and you're done!


Go Canucks Go!  Game on =)

- SheNailedMe