Showing posts with label flower. Show all posts

Thursday, July 21, 2011

Blossoming

This nail look reminds me of Arizona Iced Tea cans.  Hope you like it!

You will need:
  • Sally Hansen Xtreme Wear in Mint Sorbet
  • Revlon Nail Enamel in Chocolate Truffle
  • Sally Hansen Hard as Nails in Tea Rose
  • Jordana in Island Fuchsia
  • Seche Vite Top Coat
    1.  Can you tell I love this colour?  Paint your base!

     2.  Using the brush from the bottle, paint branches on to the nails. You don't have to be clean.


    3.  Dot on light pink flower pedals.

    4.  Finally dot on a darker pink in the center of the larger pedals.  Don't forget to top coat!


    It's really easy to do.  I added pedals on the other nails to make it look like the blossoms are blowing on to those nails.  Close enough?

    - SheNailedMe

    Monday, May 9, 2011

    Summer Fresh

    Inspired by an H&M polish I got recently!  The colour is called Summer Fresh =P
    The polish has very subtle shimmer and looks great on its own on short nails.  Unfortunately, it chips the next day but I wasn't expecting much from a $2 polish.  I still love the colour regardless.

    You will need:
    • H&M Summer Fresh 
    • Sally Hansen Xtreme Wear White On
    • Sally Hansen Hard As Nails Tea Rose
    • Rimmel Top Coat
    • Fine paintbrush
    • Toothpick/paperclip/dotting tool
     1.  Start off with Summer Fresh polish.

    2.  Dot 5 white dots in a circle on one corner of the nail.

     3.  Make 'V' shapes from the dots until you get 5 V's in a circle.

    4.  Now fill in the V's so you have triangles.  You have your flower petals =)

    5.  Now dot from the opposite corner towards the flower getting narrower as you get closer to the flower.

    6.  Dot some pink dots including the center of the flower.  Top coat =)


    I dotted the other nails in a simple all over dot pattern.  You can leave them blank if you think there's too much going on.  This is a cute look and because the colours are all subtle, you can wear it with your everyday look.  I just wish it would last more than a day =(

    Enjoy!

    - SheNailedMe

    Monday, April 18, 2011

    Breezy Blue Flowers

    Time to work on a steady hand.  I wanted to paint some flowers but have them a little more interesting.  I also got some new fakes in the mail.  They're clear, so you might see the tape through them =P.  Hope you like this one!


    You will need:
    • Wet n Wild Megalast Hush Hush (pale pale light pink)
    • Jordana Black
    • Claire's Mermaid (pearly turquoise)
    • Kiss Nail Art Paint Silver
    • Thin paintbrush
    • Paperclip/toothpick/dotting pen
    • 50+ mins
     1. You can paint a base colour or leave it bare.  It looks good either way.  Paint 3 lines on the corner of the nail with a turquoise nail polish.

    2.  Outline the 3 lines with black and a thin paintbrush as if painting part of a flower shape.

    3.  At the tip of the pedals, paint a little curve out.

    4.  Continue with the other pedals but curving the line towards the middle pedal.

    5.  Using silver nail polish, fine line the center of the pedals and on the edges around the black.  I left the inner curves alone.

    6.  Finally dot the outer curves with black.  Top coat and done!


    It kind of looks like whimsical flowers in the wind??  A little bit more work but good practice for a steady hand.  It's eye catching too!

    Good luck!

    - SheNailedMe

    Tuesday, March 29, 2011

    Vintage Florals

    Floral prints are hot!  I've been wanting the perfect spring floral dress but haven't had any luck.  That doesn't mean I can't dress up my nails to suit the latest trend.  These nails will have to do for now.(Sorry about the ever changing camera quality and lighting.  Trying to find a good one to work with!)


    You will need:
    • Joe Powder Blue (light blue)
    • Joe Orchid (plum)
    • Rimmel Lasting Finish Pro Steel Grey (greyish mauve)
    • Joe Faded Violet (lavender)
    • Joe Jade (green)
    • Joe Butter (light yellow)
    • Thin paintbrush
    • Paint dish
    • 60 mins
    Lots of Joe products it seems =P


    1. Paint a base coat of light blue (Joe's powder blue).

    2. Paint uneven spots with a plum colour (Joe's orchid).  You don't have to be perfect with this.

    3.  Paint a greyish mauve (Rimmel's steel grey) on top of the plum colour.  Make sure you leave some plum colour exposed on the edges as shown.  Again, you don't have to make this perfect.

    4.  Paint a dot in the center of the spots and thin wavey lines surrounding it as shown with a lavender colour.  You now have your flowers!

    5.  I mixed Joe's Jade with Butter to get a lighter shade of green.  Paint small leaves around the flowers with a thin paintbrush.

    6.  Paint over the green with some light yellow (Joe's Butter).

    7.  Top coat it and you're done!


    Experiment with other colours!  This is a really simple design to do because you don't have to be perfect with it.

    Feel free to suggest any design ideas! 

    - SheNailedMe

    Monday, March 14, 2011

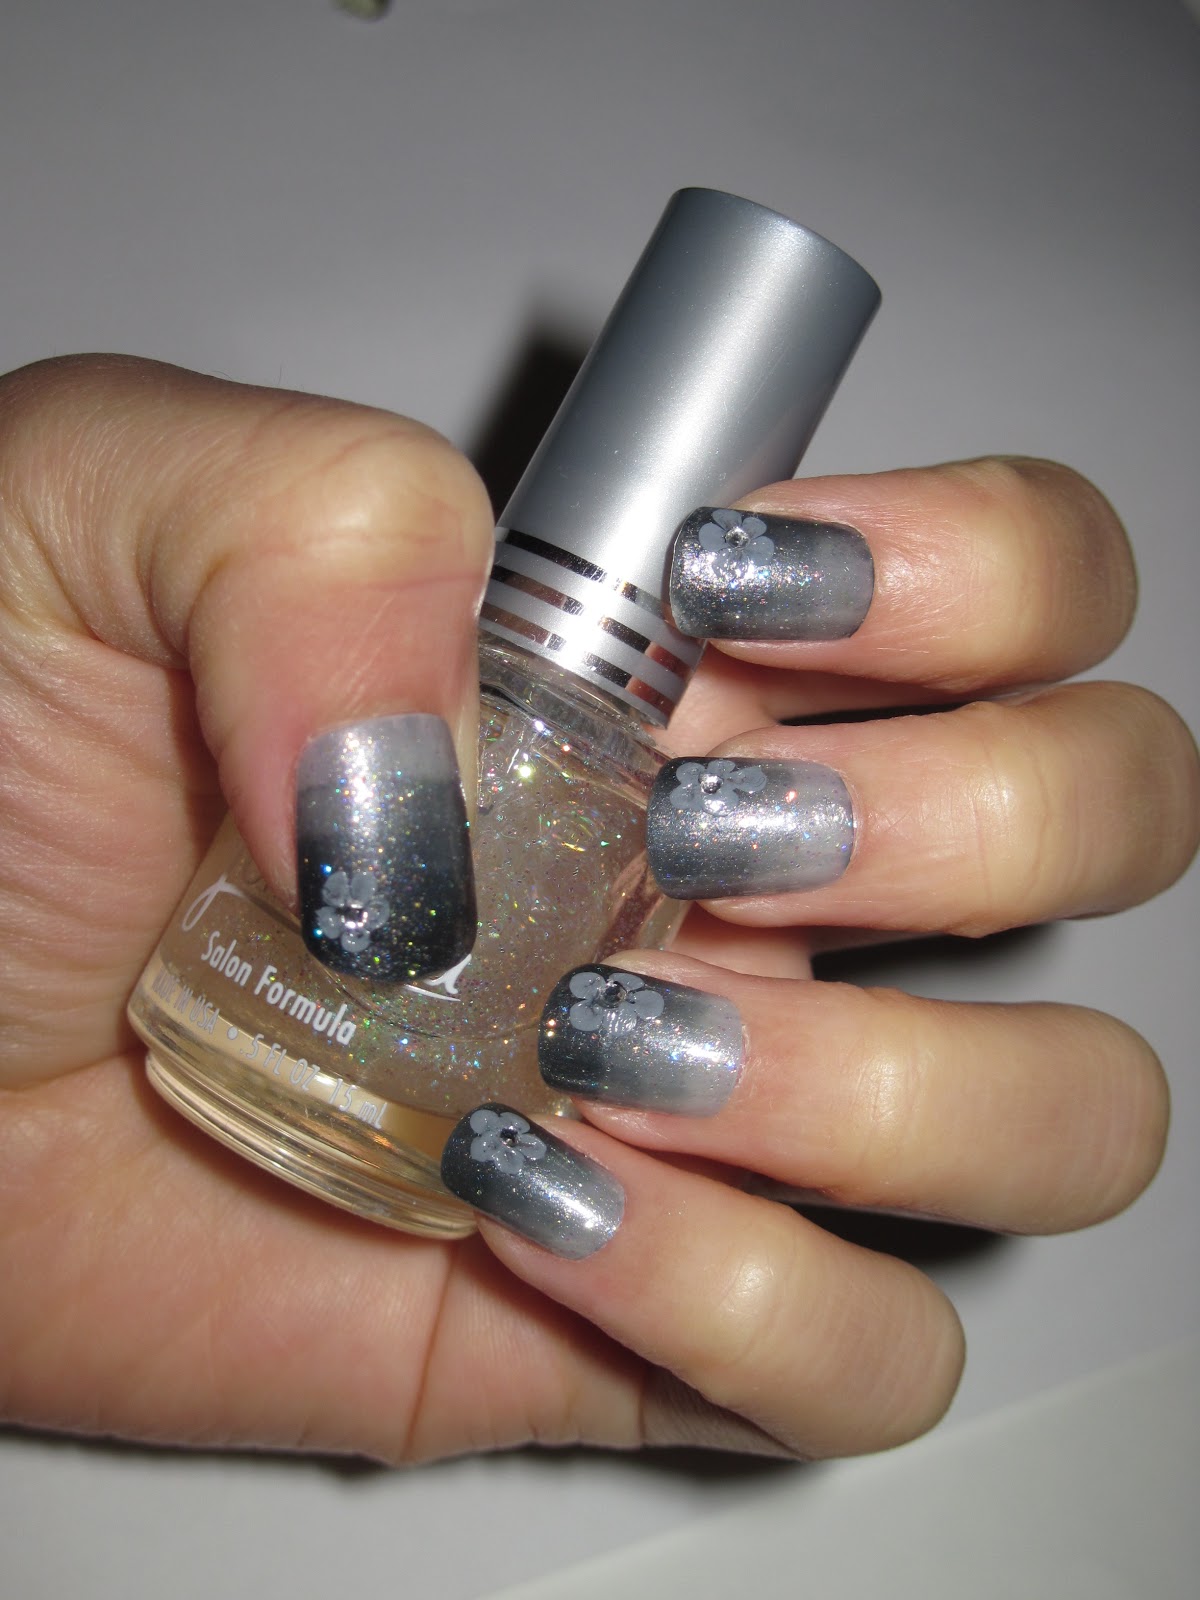
    Grey Gradient

    The rain in Vancouver doesn't have to be gloomy.  I got my inspiration this week from the weather we have been having.


    You will need:
    • OPI Brand New Skates (sheer shimmery grey polish)
    • Jordana Crystal Glitter (clear glitter polish)
    • Rimmel Grey Matter (creamy grey polish)
    • Paper clip
    • Contacts container


    Let's get started!


    1. Paint layers onto your nail getting closer to the tip each time.

    2. Paint a layer of clear glitter over top.  You can add a top coat and leave the design as is or continue to the next step.

    3. Put a creamy grey into a contacts container for dipping.

    4. Dip the paper clip into the creamy grey polish and dot 5 dots in a circle.

    5. Let the creamy grey dry until it is tacky.  With the paper clip, drag a dot in towards the center of the circle creating a dip.  Do this with all 5 dots.

    6.  It should look like a flower in the end.

    7. Add a little gem in the center of your flower and you're done!


    Rainy days aren't so bad =)
     
    Good luck!


    - SheNailedMe