Showing posts with label green. Show all posts

Wednesday, December 21, 2011

Bells of Holly

Another holiday theme!!


You will need:
  • Le Chat Ultra Bond BaseCoat
  • NYC in Plush Platinum
  • Joe in Jade
  • Some red gems or beads
  • Toothpick
  • Le Chat Ultra Fast Dry TopCoat

 1.  Start with a pearly base colour.  I had to use about 3 coats of Plush Platinum.

2.  Dab on the side with a green polish.  You don't have to be neat.  Make sure you get some jagged looking edges.

3. While the green is still wet, use a toothpick to pick up your gems/beads and place them on.  Again, you don't have to be neat.  Top coat over it all to seal it.


4.  To make a tree, you do the same as before but make a triangular shape as opposed to dabbing on the side.  I added a yellow gem at the top of the tree.  It would look better with a star gem.


Deck the halls with bells of holly!  Fa la la la la la la la....

- SheNailedMe

Monday, May 16, 2011

KeroKeroKeroppi

My boyfriend likes Keroppi.  'Nuff said.  You're gonna need a really steady hand and a lot of time.

You will need:
  • Sally Hansen Xtreme Wear White On
  • Jordana Lemon Tropic
  • Jordana Black
  • Jordana Island Fuchsia
  • Jordana Electric Blue
  • Wet N Wild Red Red
  • Rimmel Cafe Au Lait
  • Rimmel Top Coat
  • Thin paintbrush (couldn't find mine so I did the details with a dotting tool)
That's a lot of polish!

1. White base.  Nice and simple.  I didn't realize how streaky I had the base =S

2.  Paint on green horizontal and vertical lines to make a checkered pattern.  This will be the pattern for all the nails.

3.  Let's paint Keroppi's head.  Paint a dome shape on the tip with green.

4.  Make 3 white circles overlapping the green dome.

5.  Outline Keroppi's head with black.  I outline after painting the inner colour because I find it easier.  Don't forget to give him rosey cheeks!

 6.  Not sure what this guy is called.  It looks like a ghost... or a tissue.  Anyway, you start off with the white shape.  Then the red bow.  And finish off by outlining/drawing in black.

 7.  Keroppi has a snail friend?  Start off with the snail body and head, then the blue shell, then the white eyes, and finally outline/draw in black.

 8. Football shaped head, white eye balls and white body.  Red stripes for his shirt.  Outline it all in black.

9.  Oh look!  A red swirl for a sun.


I think this took me way too long to do because I didn't have my thin paintbrush.  I did it all with a dotting tool.  Make sure you wait for the polish to dry (or close to it) before you outline with black.  The lines will be cleaner.  I used pictures on google as reference.

Have fun =)

- SheNailedMe

Wednesday, April 20, 2011

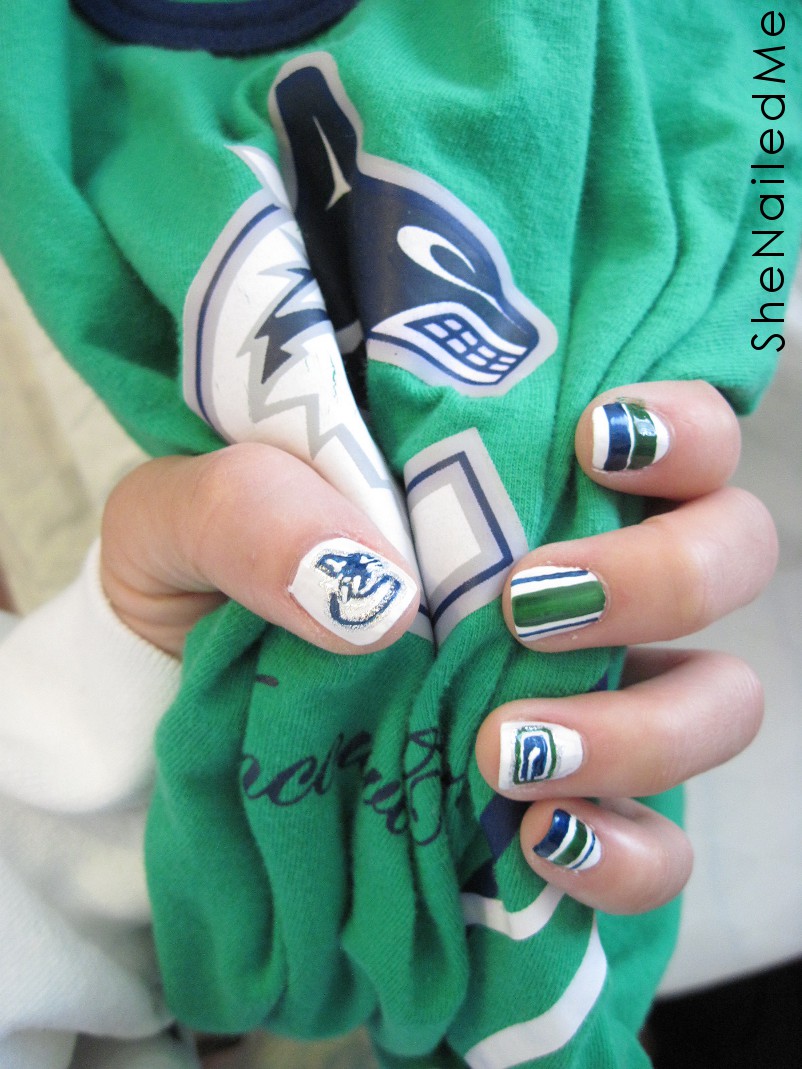
Canuckle head!

It's true.  Canadians like their hockey.  The Vancouver Canucks have been doing great.  Although we lost last night, I have faith we will beat Chicago.  I'm gonna support our team one finger at a time =P


You will need:
  • Sally Hansen Xtreme Wear White On (white)
  • Wet n Wild Wild Shine Sapphire Blue (navy blue)
  • Joe Jade (green)
  • Kiss Nail Art Paint Silver Glitter

 1.  Paint 'em white!


 2. Start painting that logo with a fine paint brush and blue.  I was looking at the logo on google images for reference.  I suggest outlining the image first and then filling it in.

3.  You should end up with something like this.  I outlined it with some silver to bring it all together.

4.  The next 2 fingers are just lines of blue and green like the jerseys.

5.  Paint the other logo.  This one is pretty straight forward.  Just a bunch of rectangles.  I thought I took pictures of painting it but it's not in my memory card =S

6.  The pinky and you're done!


Go Canucks Go!  Game on =)

- SheNailedMe

Sunday, March 27, 2011

Mint Lace

Another spring colour and design.  This one is feminine without over doing it (in my opinion).  Slop on your favorite spring colour as a base and paint on some lace.  There's another design where you actually glue on lace on your nails but I find that really unsanitary...

Yup, on my own nails this weekend =)

You will need:
  • Sally Hansen Xtreme Wear Mint Sorbet (pale green, mint chocolate chip colour)
  • Rimmel Nail Tip Whitener (white)
  • Thin paintbrush
  • Fine paintbrush
  • Contact container (for dipping)
  • 50 mins
Oops, forgot to take a picture of all the stuff I used.
But here's the Mint Sorbet polish.

 1.  Paint your base colour!  Find a nice light colour for a spring look.  But you can use anything to suit your mood or taste.  It's important that the base is dry or near dry before you start painting the lace.

2. Paint a thin white line with a thin paintbrush across the nail on a diagonal.  It doesn't have to be absolutely perfect.  Here's a helpful tip:  If you roll your thumb as your paint, the line is straighter.

3.  Now paint "bumps" or "half circles" on the line with the thin paintbrush.  The bumps should be facing away from the tip and filled in completely.

4.  Paint opposite to the line the same bumps like a mirror image but do not fill it in completely.  I used a fine paintbrush to do this.

5.  Continue with another row of bumps.  Draw another straight line to complete it.  Then finish it off with some dots on both sides of the lace.

6.  Paint a top coat and your booboo's should look less obvious. Here's a picture for comparison.  Paint away!!!


This took me about 45 mins to do both hands.  If it's your first time, it will probably take longer.  I didn't find it too difficult to paint with my left hand either (I'm a righty), it's just a bit more time consuming.

Another tip I can give is to keep a cotton ball soaked with nail polish remover.  I use it to clean off the painting brush after every nail to keep it from clumping on the brush.  And only use a drop of polish on the contact case (or painting dish) at a time.  It dries fast so using a drop creates less waste.

Hope you liked this one =)
Good luck!

- SheNailedMe